Prerequisites
LDAP Server Configuration
Linux Client Configuration
Windows Client (pGina) Configuration
Maintenance
Troubleshooting
About
For quite some time, authenticating Windows and non-Windows clients has been an administrator's nightmare since it meant that two authentication mechanisms would have to be setup, maintained, and kept in sync. One for the Windows-based systems. And one (or more) for the non-Windows systems. In consequence, the administration team must perform twice the work. And troubleshooting can take longer since one must investigate multiple systems to identify and resolve the problem.
Enter LDAP. LDAP is a protocol which is specifically optimized to read data quickly from a database. The flexibility to create custom schemas and availability of LDAP on all major platforms makes it an appropriate choice to use. Within LDAP, account information can be kept to support both Windows and Linux clients. Under Linux, this is a straightforward authentication option using PAM. Under Windows, a great plug-in was developed out of Pacific Lutheran University named pGina. This plug-in is modeled after Linux's PAM and replaces the normal Windows login manager. It enables the Windows clients to contact and authenticate to several authentication mechanisms, including LDAP.
Prerequisites
The software required to setup an LDAP server is widely available in RPM format. It is not necessary to compile anything from source.
- Linux Server
- openldap
- openldap-servers
- openldap-clients
- openldap-devel
- nss_ldap
- openssl
Linux clients just require the following four packages.
- Linux Client
- openldap
- openldap-clients
- nss_ldap
- openssl
The Windows clients need the pGina package which replaces the Windows GINA and the LDAPAuth package to authenticate to an LDAP server. Both of these packages are maintained and made freely available by the developers at http://pgina.org.
LDAP Server Configuration
Create a directory to store the root objects for your LDAP database, i.e., the LDIF files. This directory is just a staging area for the LDIF files that will be created in the steps below, so location is not paramount. It may be a good idea to keep it around in a secure place in case the LDAP database needs to be rebuilt.
/root # mkdir /root/ldapconf
/root/ldapconf # cd /root/ldapconf
/root/ldapconf #
Create directory to store LDAP database. This directory will hold all of the ldbm database files.
/root/ldapconf # mkdir /var/lib/ldap-ebloft
Create ldap admin passwd
/root/ldapconf # slappasswd
New password:
Re-enter new password:
{SSHA}e4YJDouLxNrSgL/D3m7ZG49EriuICmP8
Edit /etc/openldap/slapd.conf. Change database, suffix, rootdn, and directory directives to match the correct configuration. Copy the output from slappasswd and paste it on the rootpw directive line.
database        ldbm
suffix          "dc=ebloft,dc=sea"
rootdn          "cn=Manager,dc=ebloft,dc=sea"
rootpw          {SSHA}e4YJDouLxNrSgL/D3m7ZG49EriuICmP8
directory       /var/lib/ldap-ebloft
index   objectClass,uid,uidNumber,gidNumber,memberUid   eq
index   cn,mail,surname,givenname                       eq,subinitial
TLS/SSL Setup
Use the steps in Certificate Setup to create a Certificate Authority and a self-signed certificate to use with OpenLDAP if you do not have a certificate already.
Make sure the server's key file is able to be read by the id that runs the ldap server, usually the user is "ldap". This file should be kept in a secure place without world read permissions.
Once a valid certificate is created, the following three lines added to /etc/openldap/slapd.conf instruct the LDAP server to use TLS. The lines indicate that the server's private key and server's certificate are combined in a single file named server.pem. The file containing information about the Certificate Authority is named cacert.pem.
TLSCertificateFile /var/ebloft.sea-ssl/server.pem
TLSCertificateKeyFile /var/ebloft.sea-ssl/server.pem
TLSCACertificateFile /var/ebloft.sea-ssl/cacert.pem
Those three lines are all that are required to start LDAP with TLS on Red Hat and SuSE. By default, Red Hat will also start the ldaps server for SSL connections. In order to start the ldaps server for SSL connections on SuSE systems, edit /etc/sysconfig/openldap. Make the following change to the file.
# If set to "yes" the "ldap over ssl" feature of slapd will be enabled. Don't
# forget to add the "TLSCertificateFile" and "TLSCertificateKeyFile" options
# to the /etc/openldap/slapd.conf (man slapd.conf).
# Note: Don't confuse this with "START_TLS", the preferred method for
#       making encrypted LDAP connections, which is enabled as soon as You
#       specify "TLSCertificateFile" and "TLSCertificateKeyFile" in your config
#       file
#
OPENLDAP_START_LDAPS="yes"
Start the LDAP Server
If everything is ok so far, the LDAP server should start by using the init script that was installed as part of the RPM. For SuSE, it is rcldap start. On Red Hat systems, it is service ldap start. The chkconfig command instructs LDAP to start whenever the system enters run level 3 or 5.
/root/ldapconf # service ldap start
Starting slapd:                                            [  OK  ]
/root/ldapconf # chkconfig --level 35 ldap on
/root/ldapconf #
Create LDAP Entries
Using a text editor, create the root objects for the LDAP database. The file below contains two objects. One for the top-level ebloft.sea and one that adds the organizational unit for People, where all user objects are created.
/root/ldapconf # cat ebloft.sea.ldif
dn: dc=ebloft,dc=sea
dc: ebloft
description: Root LDAP entry for ebloft.sea
objectClass: dcObject
objectClass: organizationalUnit
ou: rootobject

dn: ou=People,dc=ebloft,dc=sea
ou: People
description: All people in organisation
objectClass: organizationalUnit
/root/ldapconf # ldapadd -x -W -D "cn=Manager,dc=ebloft,dc=sea" -f ebloft.sea.ldif
Enter LDAP Password:
adding new entry "dc=ebloft,dc=sea"

adding new entry "ou=People,dc=ebloft,dc=sea"

/root/ldapconf #
Prepare to add objects to ldap schema. Edit /usr/share/openldap/migration/migrate_common.ph. Change $DEFAULT_MAIL_DOMAIN and $DEFAULT_BASE.
# Default DNS domain
$DEFAULT_MAIL_DOMAIN = "ebloft.sea";

# Default base
$DEFAULT_BASE = "dc=ebloft,dc=sea";
Now run migrate_passwd.pl to create LDAP entries for accounts listed in /etc/passwd.
/root/ldapconf # /usr/share/openldap/migration/migrate_passwd.pl /etc/passwd passwd.ldif
/root/ldapconf # tail passwd.ldif
dn: uid=bob,ou=People,dc=ebloft,dc=sea
uid: bob
cn: bob
objectClass: account
objectClass: posixAccount
objectClass: top
objectClass: shadowAccount
userPassword: {crypt}$1$SBo8cFfd$Nqc9yqobHxwiom/0BLPnf.
shadowLastChange: 12502
shadowMax: 99999
shadowWarning: 7
loginShell: /bin/bash
uidNumber: 2000
gidNumber: 2000
homeDirectory: /home/bob

/root/ldapconf #
Edit passwd.ldif to include only the accounts to add to LDAP, i.e. remove all system accounts: daemon, adm, bin, lp, sync, halt, mail, news, games, operator, ftp, etc.
/root/ldapconf # ldapadd -x -W -D "cn=Manager,dc=ebloft,dc=sea" -f passwd.ldif
Enter LDAP Password:
adding new entry "uid=bob,ou=People,dc=ebloft,dc=sea"

/root/ldapconf #
Linux Client Configuration
The openldap RPM package installs an ldap.conf file. This file contains the information the client must know to contact the appropriate LDAP server.
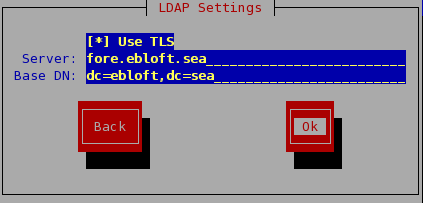
In this example, the LDAP server is installed on fore.ebloft.sea and the distinguished name is dc=ebloft,dc=sea.
If a self-signed certificate was created, the Certificate Authority file cacert.pem must be copied to each client so that it knows to trust the server.
# cd /etc/openldap
# scp serverhost:/path/to/cacert.pem .
Edit /etc/openldap/ldap.conf. Make the changes for URI, BASE, and TLS_CACERT.
#BASE   dc=example, dc=com
#URI    ldap://ldap.example.com ldap://ldap-master.example.com:666

#SIZELIMIT      12
#TIMELIMIT      15
#DEREF          never
URI ldap://fore.ebloft.sea
BASE dc=ebloft,dc=sea

TLS_CACERT /etc/openldap/cacert.pem
The nss_ldap package uses a separate LDAP configuration file. This file, by default, is installed in /etc/ldap.conf. It contains many configuration options and settings for authentication, but the critical ones to get started are: host, base, tls_cacertfile, and ssl.
# Your LDAP server. Must be resolvable without using LDAP.
# Multiple hosts may be specified, each separated by a
# space. How long nss_ldap takes to failover depends on
# whether your LDAP client library supports configurable
# network or connect timeouts (see bind_timelimit).
host fore.ebloft.sea

# The distinguished name of the search base.
base dc=ebloft,dc=sea

# For TLS connections
tls_cacertfile /etc/openldap/server.pem
ssl start_tls
Test LDAP connectivity from the client host
$ ldapsearch -x "cn=bob"
# extended LDIF
#
# LDAPv3
# base <> with scope sub
# filter: cn=bob
# requesting: ALL
#

# bob, People, ebloft.sea
dn: uid=bob,ou=People,dc=ebloft,dc=sea
uid: bob
cn: bob
objectClass: account
objectClass: posixAccount
objectClass: top
objectClass: shadowAccount
userPassword:: e2NyeXB0fSqxJfNCrzhjRmlkJE5x6zl5cW9iSHh3aj9tLoBTTFBuZi4=
shadowLastChange: 12502
shadowMax: 99999
shadowWarning: 7
loginShell: /bin/bash
uidNumber: 2000
gidNumber: 2000
homeDirectory: /home/bob

# search result
search: 2
result: 0 Success

# numResponses: 2
# numEntries: 1
$
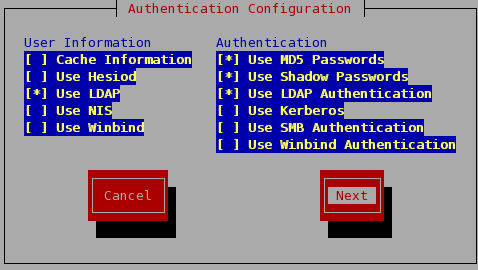
On Red Hat/Fedora systems, the next step is to run authconfig. This nifty program simplifies setting up the authentication mechanism on the system. Each time it is run, it will update /etc/pam.d/system-auth with the chosen authentication mechanisms. In turn, this file is referenced by all of the other applications and services that run on the system.
Try logging in as bob on the client machine. For testing, create the home directory, e.g. /home/bob.
$ su -
Password:
# cp -r /etc/skel /home/bob
# chown -R bob:users /home/bob
# exit
$ su - bob
Password:
$ pwd
/home/bob
$ id
uid=2000(bob) gid=2000(users) groups=2000(users)
$
Good, the Linux client is authenticating to the LDAP server. NSCD can be enabled in authconfig so repeated queries are not sent to the LDAP server.
Windows Client Configuration
Install the pGina and LDAPAuth plug-ins using the windows installer. Start pGina. Load the LDAPAuth plug-in module. Configure the LDAPAuth module. Enter the IP address of the LDAP server. In the contexts box, enter the search path for the user objects. In this case: ou=People,dc=ebloft,dc=sea.
View screenshots of a pGina installation using SSL.
Maintenance
Reset LDAP user account passwords
The following three commands would reset the password for bob's account. The ldappasswd command automatically generates and sets the password unless run with the -S (prompt for new password) or -s (specify new password) command line options.
$ ldappasswd -x -W -D "cn=Manager,dc=ebloft,dc=sea" "uid=bob,ou=People,dc=ebloft,dc=sea"
Enter bind password:
New password: cR30eZ5L
Result: Success (0)
$ ldappasswd -S -x -W -D "cn=Manager,dc=ebloft,dc=sea" "uid=bob,ou=People,dc=ebloft,dc=sea"
New password:
Re-enter new password:
Enter bind password:
Result: Success (0)
$ ldappasswd -s NewpasS -x -W -D "cn=Manager,dc=ebloft,dc=sea" "uid=bob,ou=People,dc=ebloft,dc=sea"
Enter bind password:
Result: Success (0)
$
Removing Users
The following command would delete the account for bob that was previously created.
$  ldapdelete -x -W -D "cn=Manager,dc=ebloft,dc=sea" "uid=bob,ou=People,dc=ebloft,dc=sea"
Enter LDAP Password:
$
LDAP Logging
OpenLDAP's default loglevel (256) writes extensive output. It is recommended to setup a log file only for ldap. Edit /etc/syslog.conf and add a line for ldap.
# ldap logging
local4.*				/var/log/ldap
For systems using logrotate, use a text editor to create the following file /etc/logrotate.d/ldap. This will manage the ldap log file, compressing and rotating it as needed. logrotate is normally configured to run daily from cron (check /etc/cron.daily for a logrotate entry).
/var/log/ldap {
    compress
    rotate 99
    size=+4096k
    notifempty
    missingok
    create 600 root root
    postrotate
        /sbin/service ldap reload  2> /dev/null > /dev/null || true
    endscript
}
Troubleshooting
- Lost LDAP Manager password
- The manager password can be reset anytime by the root user running the slappasswd command. Take the SSHA hash from slappasswd and replace the rootpw directive in /etc/openldap/slapd.conf with it. Then, restart ldap, i.e. service ldap restart.
- Problems and errors when using ldapadd
- Check the LDIF file. Check the LDIF file again. LDAP is extremely strict about the format of LDIF files. A COMPLETELY BLANK, EMPTY line must separate entries. A line that looks blank, but has whitespace, e.g. a tab or a space, will cause LDAP to throw an error.
- Some typical errors that usually indicate something is incorrect in LDIF entries are:
ldap_add: Undefined attribute type (17)
        additional info: dn: attribute type undefined
ldap_add: No such object (32)
        additional info: parent does not exist
ldap_add: Constraint violation
        additional info: shadowLastChange: multiple value provided
- Server is unwilling to perform
- Check the LDIF file in question to make sure the dc entries match the suffix specified in /etc/openldap/slapd.conf.
- For example, suppose I specified suffix "dc=ebloft,dc=sea" in my
/etc/openldap/slapd.conf file and was working with an LDIF file that indicated
dn: dc=example,dc=com in it. These two entries don't match and the
LDAP server would not know what to make of dc=example,dc=com, hence the error.
ldap_add: Server is unwilling to perform (53)
        additional info: no global superior knowledge
- Enable Logging
- Edit /etc/syslog.conf. Add line:
# ldap logging
local4.*				/var/log/ldap
- Edit /etc/openldap/slapd.conf. The following line will create
extensive output. It should only be used while actively troubleshooting.
Add line:
loglevel -1
- Restart syslog and ldap
- Edit /etc/syslog.conf. Add line:
- Use tethereal
- This command will print the traffic from the source host NAME to either
the ldap (389) or ldaps (636) ports.
# tethereal src host NAME and port ldap or port ldaps
- This command will print the traffic from the source host NAME to either
the ldap (389) or ldaps (636) ports.
- Check ACLs
- OpenLDAP has many mechanisms for allowing and restricting access to
many parts of the database. Ensure that the ACLs are set up correctly
in /etc/openldap/slapd.conf. For TLS/SSL, ensure the
proper permission for accessing the password exists. For example:
access to attr=userPassword
        by self write
        by users read
        by anonymous auth
- OpenLDAP has many mechanisms for allowing and restricting access to
many parts of the database. Ensure that the ACLs are set up correctly
in /etc/openldap/slapd.conf. For TLS/SSL, ensure the
proper permission for accessing the password exists. For example:
- Copy CA certificate to clients for TLS/SSL.
- The CA certificate file (if self-signed or not recognized as a root authority) must be copied to the client host so it trusts the authority explicitly.
- Edit /etc/openldap/ldap.conf
URI ldap://fore.ebloft.sea
BASE dc=ebloft,dc=sea
TLS_CACERT /path/to/certificate/file.pem
- Edit /etc/ldap.conf for NSS_LDAP authentication.
host fore.ebloft.sea
ssl start_tls
password md5
- OS X Vague LDAP failures
- The LDAP implementation on OS X closely resembles OpenLDAP, but
setting up and debugging can be a little tricky. This error is not
very descriptive and could point to many failures.
InitLDAPConnection or ldap_init failure: Logging Failed LDAP connection with incomplete data
To debug, use ktrace and kdump on the DirectoryService process id, use tethereal on the OpenLDAP server. For OS X clients attempting SSL connections, verify there are no problems with the certificate first.
- The LDAP implementation on OS X closely resembles OpenLDAP, but
setting up and debugging can be a little tricky. This error is not
very descriptive and could point to many failures.
